Ferris Bueller's Day Off, which hit theaters 25 years ago this week and will soon be re-released on Blu-Ray and DVD, inspires a special kind of reverence in suburbia. "Today you'd be hard-pressed to find an American high-school yearbook that doesn't quote somewhere in its pages Ferris Bueller's view on existence," author Susannah Gora writes in her book You Couldn't Ignore Me If You Tried: The Brat Pack, John Hughes, And Their Impact on a Generation. Before going with a bromidic Bob Dylan lyric, I almost made my own senior quote, "Life moves pretty fast. If you don't stop and look around once in a while, you could miss it." In hindsight, it seems about as profound as a fortune cookie. I guess being 17 is a good excuse for banality. via Get Over 'Ferris Bueller,' Everyone - Alan Siegel - Entertainment - The Atlantic.I find it interesting that someone would take the 25th anniversary of the movie as an opportunity to apply a metaphorical scalpel to a movie about high school kids skipping school for one day. I like the movie. I don't think I'd call it a "perfect" movie, but then I wouldn't give that designation to any movie. Even "Citizen Kane" has moments of profound pomposity, and "Mary Poppins" has Dick Van Dyke's abysmal "English" accent. But I'd be hard pressed to recommend a movie which provides an equivalently universal high school senior dream for the day than Ferris Bueller's Day off. I mostly am glad Glen Reynolds linked this article so I remember to get the Blue Ray when it comes out. And I don't buy many movies on Blue Ray.
Living
Brothers?
By CosmicConservativeFerris Bueller revisited
By CosmicConservativeSome movie reviews...
By CosmicConservativeHaven't been posting reviews like I usually do, so I'll hit a few movies I've seen lately in this post:
X-Men: First Class - This had its moments. I liked the cast and particularly liked the interaction between the young Xavier and Erik (Magneto). There was more "plot" than most action movies and some interesting historical references. I particularly liked how they rewrote the history of the Cuban Missile Crisis with no concern whatsoever for trying to tie that back into the real world's history. The X-Men world clearly diverged from our world into an alternate universe, which is fine, I think too many movies try too hard to exist in a fantasy world and the real world at the same time.
The best part of the movie:
 I know they played up January Jones but whether by choice or not, her performance seemed to be the most plastic and mailed in performance I've seen from a "major" actor in a long time. Her role could have been performed by a Japanese fembot.
Thor: I actually really liked this movie. Oh, sure, it had it's ludicrous moments, and I could pick it apart if I wanted to, but there was a real sense of energy and excitement to some of the scenes. I generally don't care much for Natalie Portman, but she can be quite good on occasion and at least she didn't mail in her performance here. My favorite moment in the movie was probably the visible shock wave from the sonic boom of Thor's hammer when Odin restored his powers.
The Green Hornet: Heh, what can I say about this movie? I enjoyed it because it was so totally ridiculous in every possible way. The whole movie struck me as if the script was written in a frat house by a bunch of beer-swilling comic book fans. The worst moment of the movie was the supposed inability of Kato to swim. But putting that aside, this was just pure fun.
Cosmic says check all three out.
I know they played up January Jones but whether by choice or not, her performance seemed to be the most plastic and mailed in performance I've seen from a "major" actor in a long time. Her role could have been performed by a Japanese fembot.
Thor: I actually really liked this movie. Oh, sure, it had it's ludicrous moments, and I could pick it apart if I wanted to, but there was a real sense of energy and excitement to some of the scenes. I generally don't care much for Natalie Portman, but she can be quite good on occasion and at least she didn't mail in her performance here. My favorite moment in the movie was probably the visible shock wave from the sonic boom of Thor's hammer when Odin restored his powers.
The Green Hornet: Heh, what can I say about this movie? I enjoyed it because it was so totally ridiculous in every possible way. The whole movie struck me as if the script was written in a frat house by a bunch of beer-swilling comic book fans. The worst moment of the movie was the supposed inability of Kato to swim. But putting that aside, this was just pure fun.
Cosmic says check all three out.Slingshots and BB guns...
By CosmicConservativeA few months ago I bought a slingshot. Slingshots are not the same today as they were when I was a kid. This slingshot looks like something you'd find on the Space Shuttle. It's all aluminum metal with plastic handle and a forearm brace that allows you to relieve stress on your wrist when you haul back on the surgical tubing rubber "bands."
But in the end it's just a singshot, with two rubber cords attaching to the handheld forked mount with a leather pouch to load pellets, rocks or marbles.
I practiced with it for a few days and then started carrying it with me when I walked the dog, shooting a dozen or so pellets (bio-degradable ones, 'cause I'm Al Gore's slingshot disciple) at trees, stumps and decrepit bird-feeders in the yard.
I've made some pretty amazing shots with that slingshot. And I've pelted a couple of annoying wildlife denizens who wake us up early on weekend mornings.
But as many amazing shots as I've made, it's still a rather scattershot means of hitting a target. Especially when your target is the size of a small bird or a squirrel. So the few times I've fired my entire handful of pellets at an annoying woodpecker only to miss time after time, I've contemplated purchasing a BB gun for a more reliable means of hitting such small targets.
Well, this weekend I took the plunge and bought a Crossman pump-action single-shot bb/pellet gun.
It's really more a pellet gun since the BBs tend to roll out of the barrel if you tilt it downward before you fire. The pellets stay put.
So yesterday I did some target practice with the BB gun. I set up a 10m competition target (purchased at Bass Pro Shops, just like the gun) at roughly 15m (paced off to 15 yards) and took some shots at it.
Yes, it's much more reliable than the slingshot. I never missed the target and put almost every shot into the black part of the target (a circle roughly the size of a soda can diameter).
Just for fun I also took a couple of shots at the target from the same distance with my slingshot.
Right. In. The. Dead. Center. First shot. When I say "dead center" I don't mean "sorta close to the dead center if you tilt your head and squint a certain way". I mean Dead. Center. You couldn't get closer to the center with a compass and straight edge.
So I set up another target and pelted it with the BB gun. Never once hit the dead center.
So today I went out and set up a target at 100 meters and started shooting at it. Out of ten shots I only got two in the target's circles. Two.
So I tried the slingshot. Didn't even hit the PAPER.
Shot another ten shots with the BB gun. Another couple of shots in the target, but NOTHING in the black. The black was pure and untouched.
So I cut the distance in half. 50 meters. I pelted it with another ten rounds from the BB gun. I missed the black twice, which sorta bugged me.
So I then just whipped out the slingshot again and hip-shot casually at the target.
Right. In. The. Dead. Center.
I mean perfectly in the center.
Perfectly.
Now, does this mean I'm a better shot with a slingshot?
How in the heck did I do that TWICE?
Minis by the millions
By CosmicConservativeWell, by the hundreds anyway...
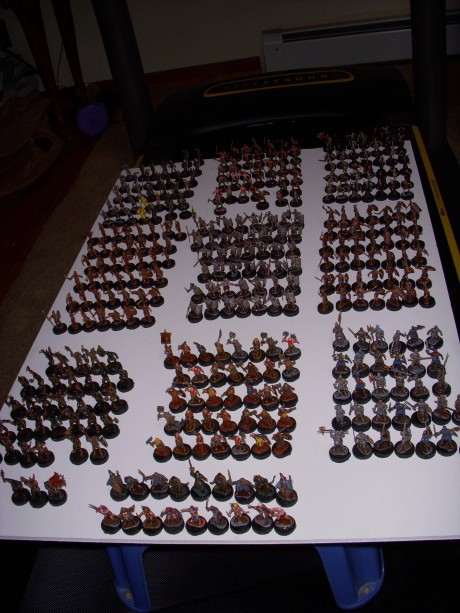
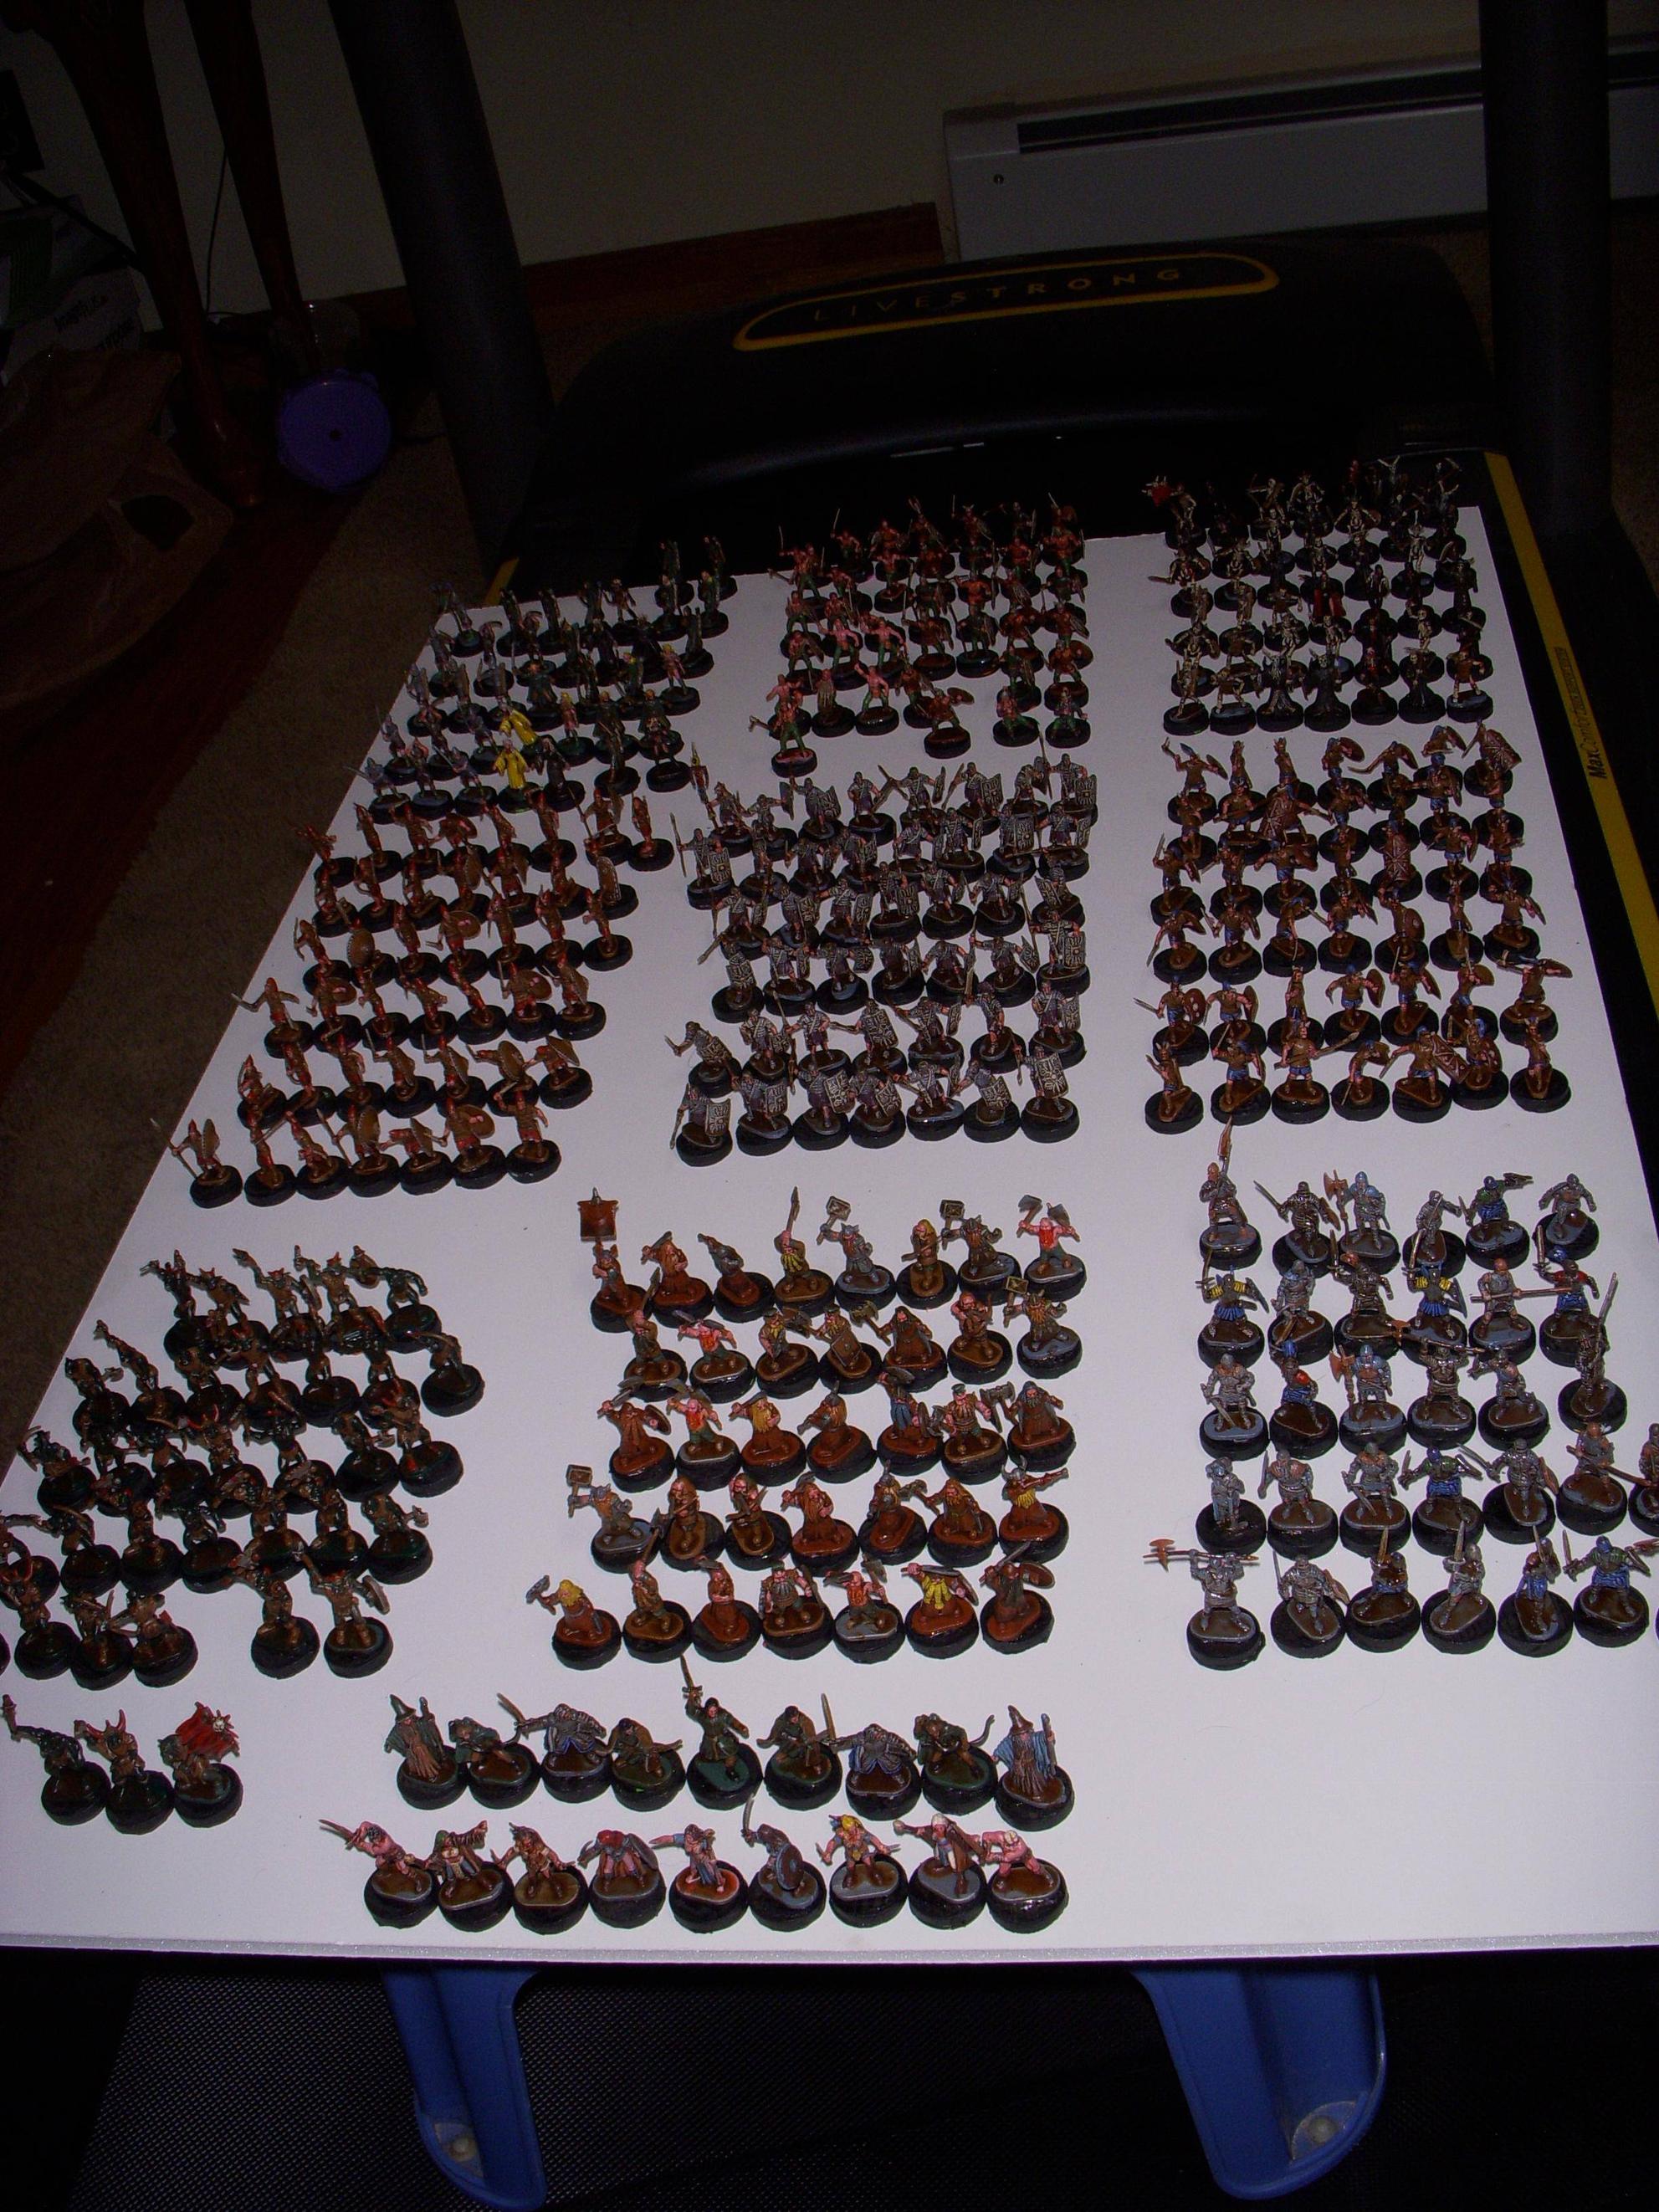
Things I learned from painting 367 1" miniatures
By CosmicConservativeLast night I finally wrapped up the final steps of the mini painting marathon I've been on. Those final steps were the assembling and painting of the bases, the spraying of a final matte finish sealer/glaze on the minis and the glueing of the minis onto the bases. All done now. They are now playable minis that will get stored with my pre-existing mini collection.
The total cost on this little endeavor?
- Miniatures $71.55
- Shipping $6.50
- Paints $2.00
- Bases $3.49
- Shipping $1.50
- Glaze/Sealer $3.00
- Glue $2.00
- Brushes $1.95
Total - $91.99, let's call it $92.
For that I received 360 or so miniatures in ten different sets. The sets were:
- Roman Legionnaires
- Mycenaean army
- Assyrian army
- Celtic army
- Undead
- Elves
- Dwarves
- Adventurers (this included a large troll that was easily worth the $7.95 cost all by itself)
- Orcs
- Knights
Not counting the troll (which I see as a sort of bonus) I spent basically $.25 each on the minis. I don't think you'll find a better deal on minis. Mini collections selling on eBay tend to run from $1 - $2 per mini for large lots of 100 or so, and most of those are usually common minis along with random uncommons or rares and aren't generally composed of sets that can serve a particular purpose. So since I got pretty much exactly what I wanted and need for my RPG campaigns, I think the cost is more than reasonable.
Now, I received the minis last Thursday, but wasn't able to open them and start doing anything with them until Friday. I've been doing a lot of painting since then. My guess is that I spent 45 hours on the project, which means I spent roughly seven and a half minutes working with each individual mini. In that seven and a half minutes I cleaned them up (removing plastic flashing or sprue remnants), painted at least 4 and up to 6 layers, dry-brushed roughly 1/4 of them and then assembled the base, glued them to the base, dunked them in varnish and then sprayed them with matte sealant. That's a lot to get done in seven minutes.
I will post pics tonight. I got done too late last night to take photos and post them. I think they came out pretty well.
So, what did I learn from this nearly $100 experiment in miniature painting/collecting? Well, here's a sort of list of lessons learned:
- Nothing is more important than a good brush. I mostly used cheap brushes (bought a pack of economy brushes from Hobby Lobby for $1.95 for like eight brushes). You get what you pay for. When I started doing the detail work, I started going through brushes pretty fast. I could have done much better detail work, and done it faster, if my brushes hadn't kept getting loose fibers that tended to leave paint where I didn't want it, and if the end of the brushes didn't keep curling up and/or bending into permanent contortions from the painting/cleaning process. A good brush costs a lot of money though... so I ended up mostly using up the cheap ones. When I paint minis in the future I will use better brushes.
- Painting such tiny items with any level of precision and detail seems to be almost entirely a lesson in self-confidence. I tend to use a "dab-dab-dab" technique because I don't really trust myself to be able to put the tip of a paint-filled brush on a tiny detail (say a tooth sticking up from a lip on an orc) and "paint" the brush along the surface, keeping paint only applied to the detailed item. However, when I did force myself to actually paint with the brush instead of dabbing at the mini with the brush, the results were invariably superior. Belts are a perfect example, With the right level of confidence I could get the tip of the brush on the edge of the belt and then draw a smooth, straight line all the way around the mini with virtually no paint leaking over from the belt onto the pants or shirt, and doing that took at most a second or two, and I was done. The "dab-dab-dab" technique almost always ended up with one of my dabs going awry and took several seconds to get around the entire mini. The more I painted, the more confidence I gained, and the more I was able to paint the mini instead of just dab at it. If I could actually get my head out of the idea that I'm going to spread paint all over the mini when I try to paint it, and just paint the dang things I need to paint, I would be a much, much better painter. Even after spending a full week painting, I still find it hard to make myself use the brush and paint the mini instead of dab at it. And to make matters worse, dabbing at the mini is what tends to wreck my brushes, which just makes the process more difficult. It's amazing how much confidence and willingness to take a risk comes into play. Probably a life lesson there.
- I found it much easier to do the painting with magnifying reading glasses on than to use the desk magnifying glass to do the painting. However, the desk magnifying glass has some clips on it that would be very helpful in painting if I were doing just one individual mini instead of trying to slog through hundreds at a time. So this is sort of a way to improve effeciency, not so much to improve quality.
- Paint is much, much easier to apply if it is thinned first. So much easier that it's sort of crazy. Unfortunately I never figured out a way to reliably and consistently thin the acrylic paint I was using. Water caused the paint to sort of get lumpy and inconsistent, no matter how much I stirred it, and rubbing alcohol created a weird metallic effect, had the same lumpy problem, and dried out in just a few minutes, leaving the paint crusty and unwilling to stick to the figure. If anyone knows a way to reliably thin acrylic paints, I would be glad to hear it. This was perhaps the single most frustrating part of the whole process, and was particularly bad on my flesh-colored paint mixes and my gray mixes.
- Certain spray paints never seem to dry. I spray painted some other items along with these purchased minis and over a week later those I painted green and gray are still tacky to the touch and leave green marks on any other minis they touch. I am really amazed by the unwillingess of these paints to dry.
- Certain spray paints are very difficult to apply the acrylic paint to. The acrylic simply doesn't want to stick, requiring several coats at best, and the "dab-dab-dab" technique at worst. This was particularly frustrating since I was trying to learn to stop doing the "dab-dab-dab" technique and when working on a mini with one of the teflon spray paints, I immediately dropped back into that technique because it was the only thing that seemed to apply paint, and then found myself 20 minutes later on a completely different mini, still dabbing. Arg. Inertia....
- Mixing paints to create specific colors is an art form all in itself. One I never remotely mastered. Especially on flesh tones. No matter what I did I could not come up with a flesh tone that didn't look too pink, too dark, or like some totally unnatural color. I ended up with a sort of dark pink that I used for virtually all of the minis, but when it dried, it came out as a sort of bright pinkish-red that looked more like a sunburn than normal skin. I figured the varnish dunking would darken that and just went ahead with it instead of wasting more time on the fruitless search for an ideal mix of paints. For individual minis I will have to figure out this step because I can't have all of my "special" minis look like sunburned lobsters.
- Don't hold the mini you are painting directly over the paint you are using. Because you will drop it, and when you do, you will have one entire side of the mini immediately painted that color. And trust me, it is dang near impossible to clean up that sort of mess.
- Details on the mini are very hard to see. Even things that would seem to be fairly obvious. Like whether the mini is wearing boots or sandals. On the Roman Legionnaires I was certain that they had metal boots because the legs had a raised lip above the ankle, just as all the other booted minis did. After painting all 40 or so of the Legionnaires with gray "boots" and letting them dry, I realized when I was assembling their shields and weapons that they actually had sandals, not boots, and they had individual toes that I had not seen. So then the question became whether to leave it with the gray feet, or to attempt to remix the flesh color (see above) and try to paint them and then paint the complex weave of sandal straps on top of the bare feet. In the end I decided that these miniatures may have technically been Roman Legionnaires, but they actually represented soldiers of the "Hanorian Guard" in my campaign, and those soldiers wore boots. Leaving their sandal clad feet painted like boots looked fine unless you looked very closelyl at them, so I ended up just leaving them painted like boots. There were many other such things, such as minis who had necklaces or wrist bands that looked like gloves at first glance. This became a common problem and there were many times after completing painting I realized that I had painted gloves when there were none, or vice versa. Oh well.... you have to look close to see these things.
- The varnish-dunking technique is amazingly effective. It hides a multitude of painting errors, and gives the final result a sort of glazed look that appears very professional. On the other hand, when dunking 360 minis, there is no way to keep an eye on how each one is drying so there are inevitable problems with varnish pooling at the bottom of areas and causing those areas to be darker and to hide details. If I were doing only a few minis, I would be able to monitor each one individually and use a paper towel or q-tip to wick away the pools of varnish that collect in certain areas, but with 360 of them, just the dunking alone took me about four hours, and there was no way to monitor each one and look for pools of varnish to deal with. So these minis have many examples of varnish drying in uneven depth across the surface of items like shields, banners, cloaks, etc. But in the end the good seems to outweigh the bad, and I did a fairly decent job of flicking off the excess varnish so that this was kept to a minimum. In fact my arm still hurts becuase each mini required from 10 - 15 arm and wrist snaps to remove excess varnish after dunking. That means I whipped my arm and wrist up and down a total of over 4,000 times in that four hours. I need to find a better way to do this, although if you are only doing a few minis, this is probably fine.
- The varnish dipping approach tends to render several colors that look quite distinct on first painting into almost identical colors. So the browns, grays, purples, blues and greens I carefully painted to show the details of cloaks, pants, belts, etc. was quite frequently overcome by the varnish and everything came out looking like a dull brown, which greatly reduced the color variation that I was looking for. To combat this I ended up using two kinds of varnish, one for the darker minis and one for the lighter ones (mostly the elves, knights and barely clothed female figures). Finding just the right color of varnish is probably a quest all in itself.
Some photos of my painted minis...
By CosmicConservative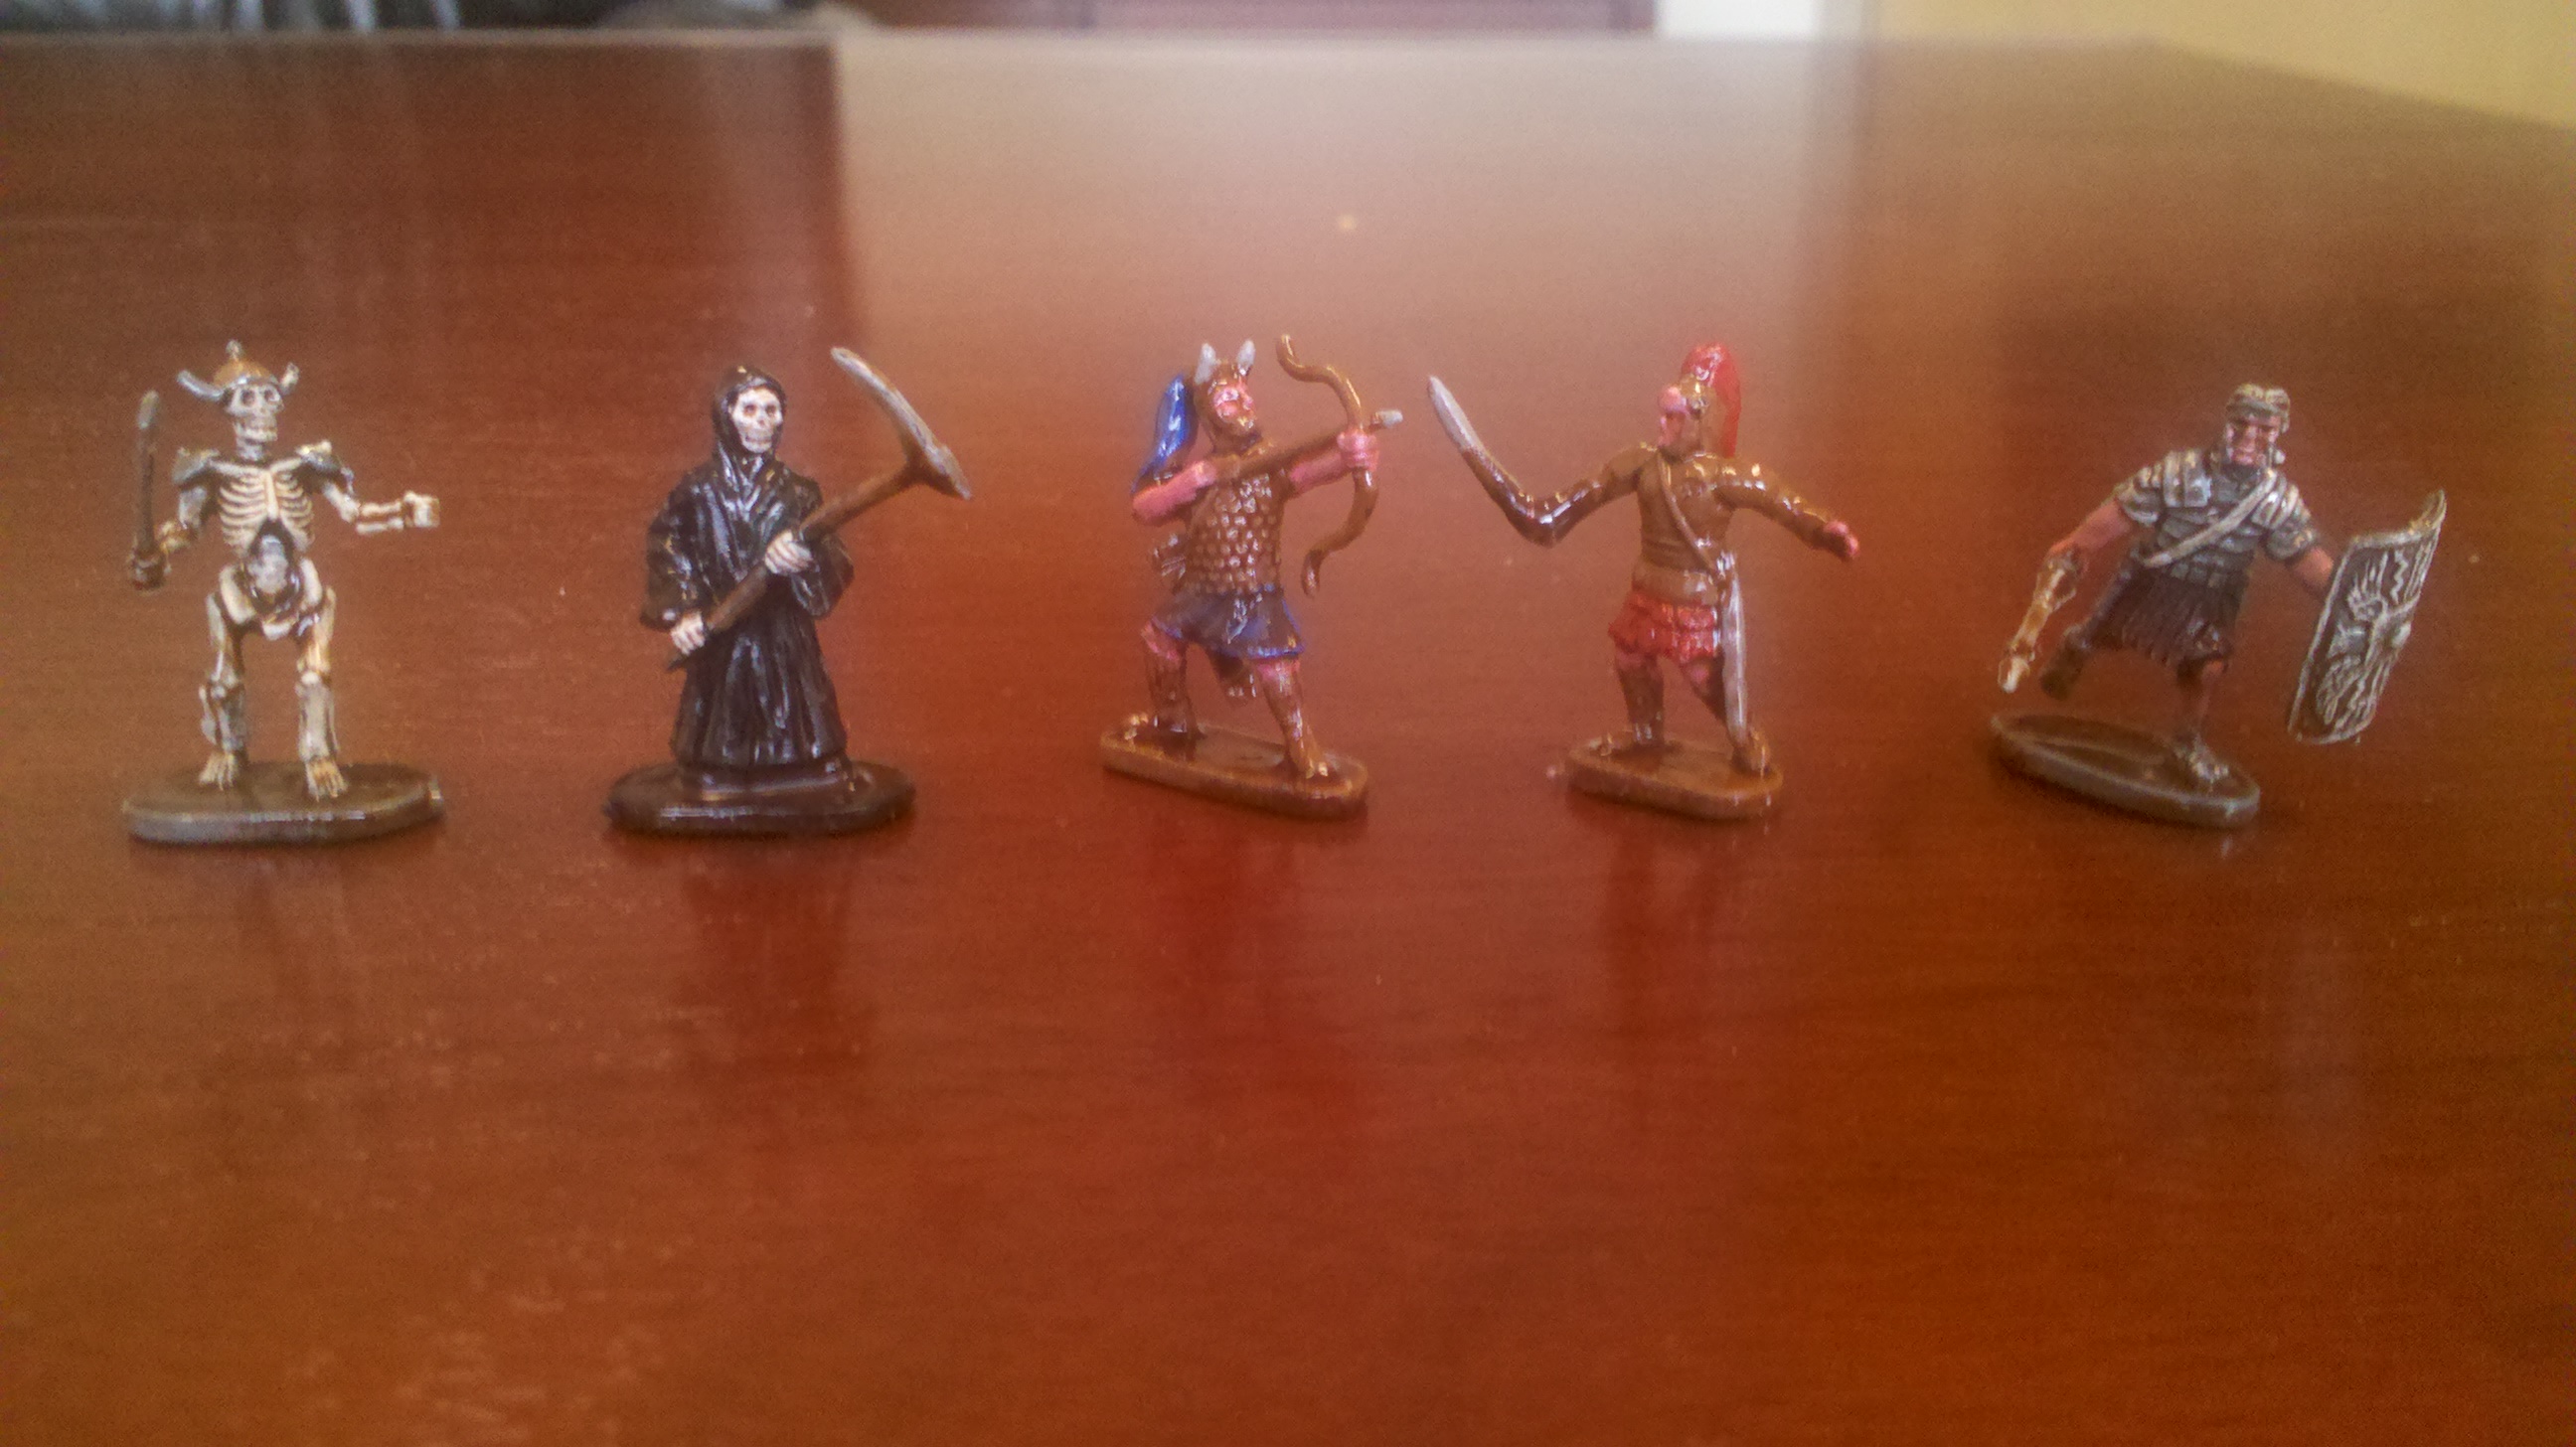 So, here are some photos of some of the miniatures I've been painting.
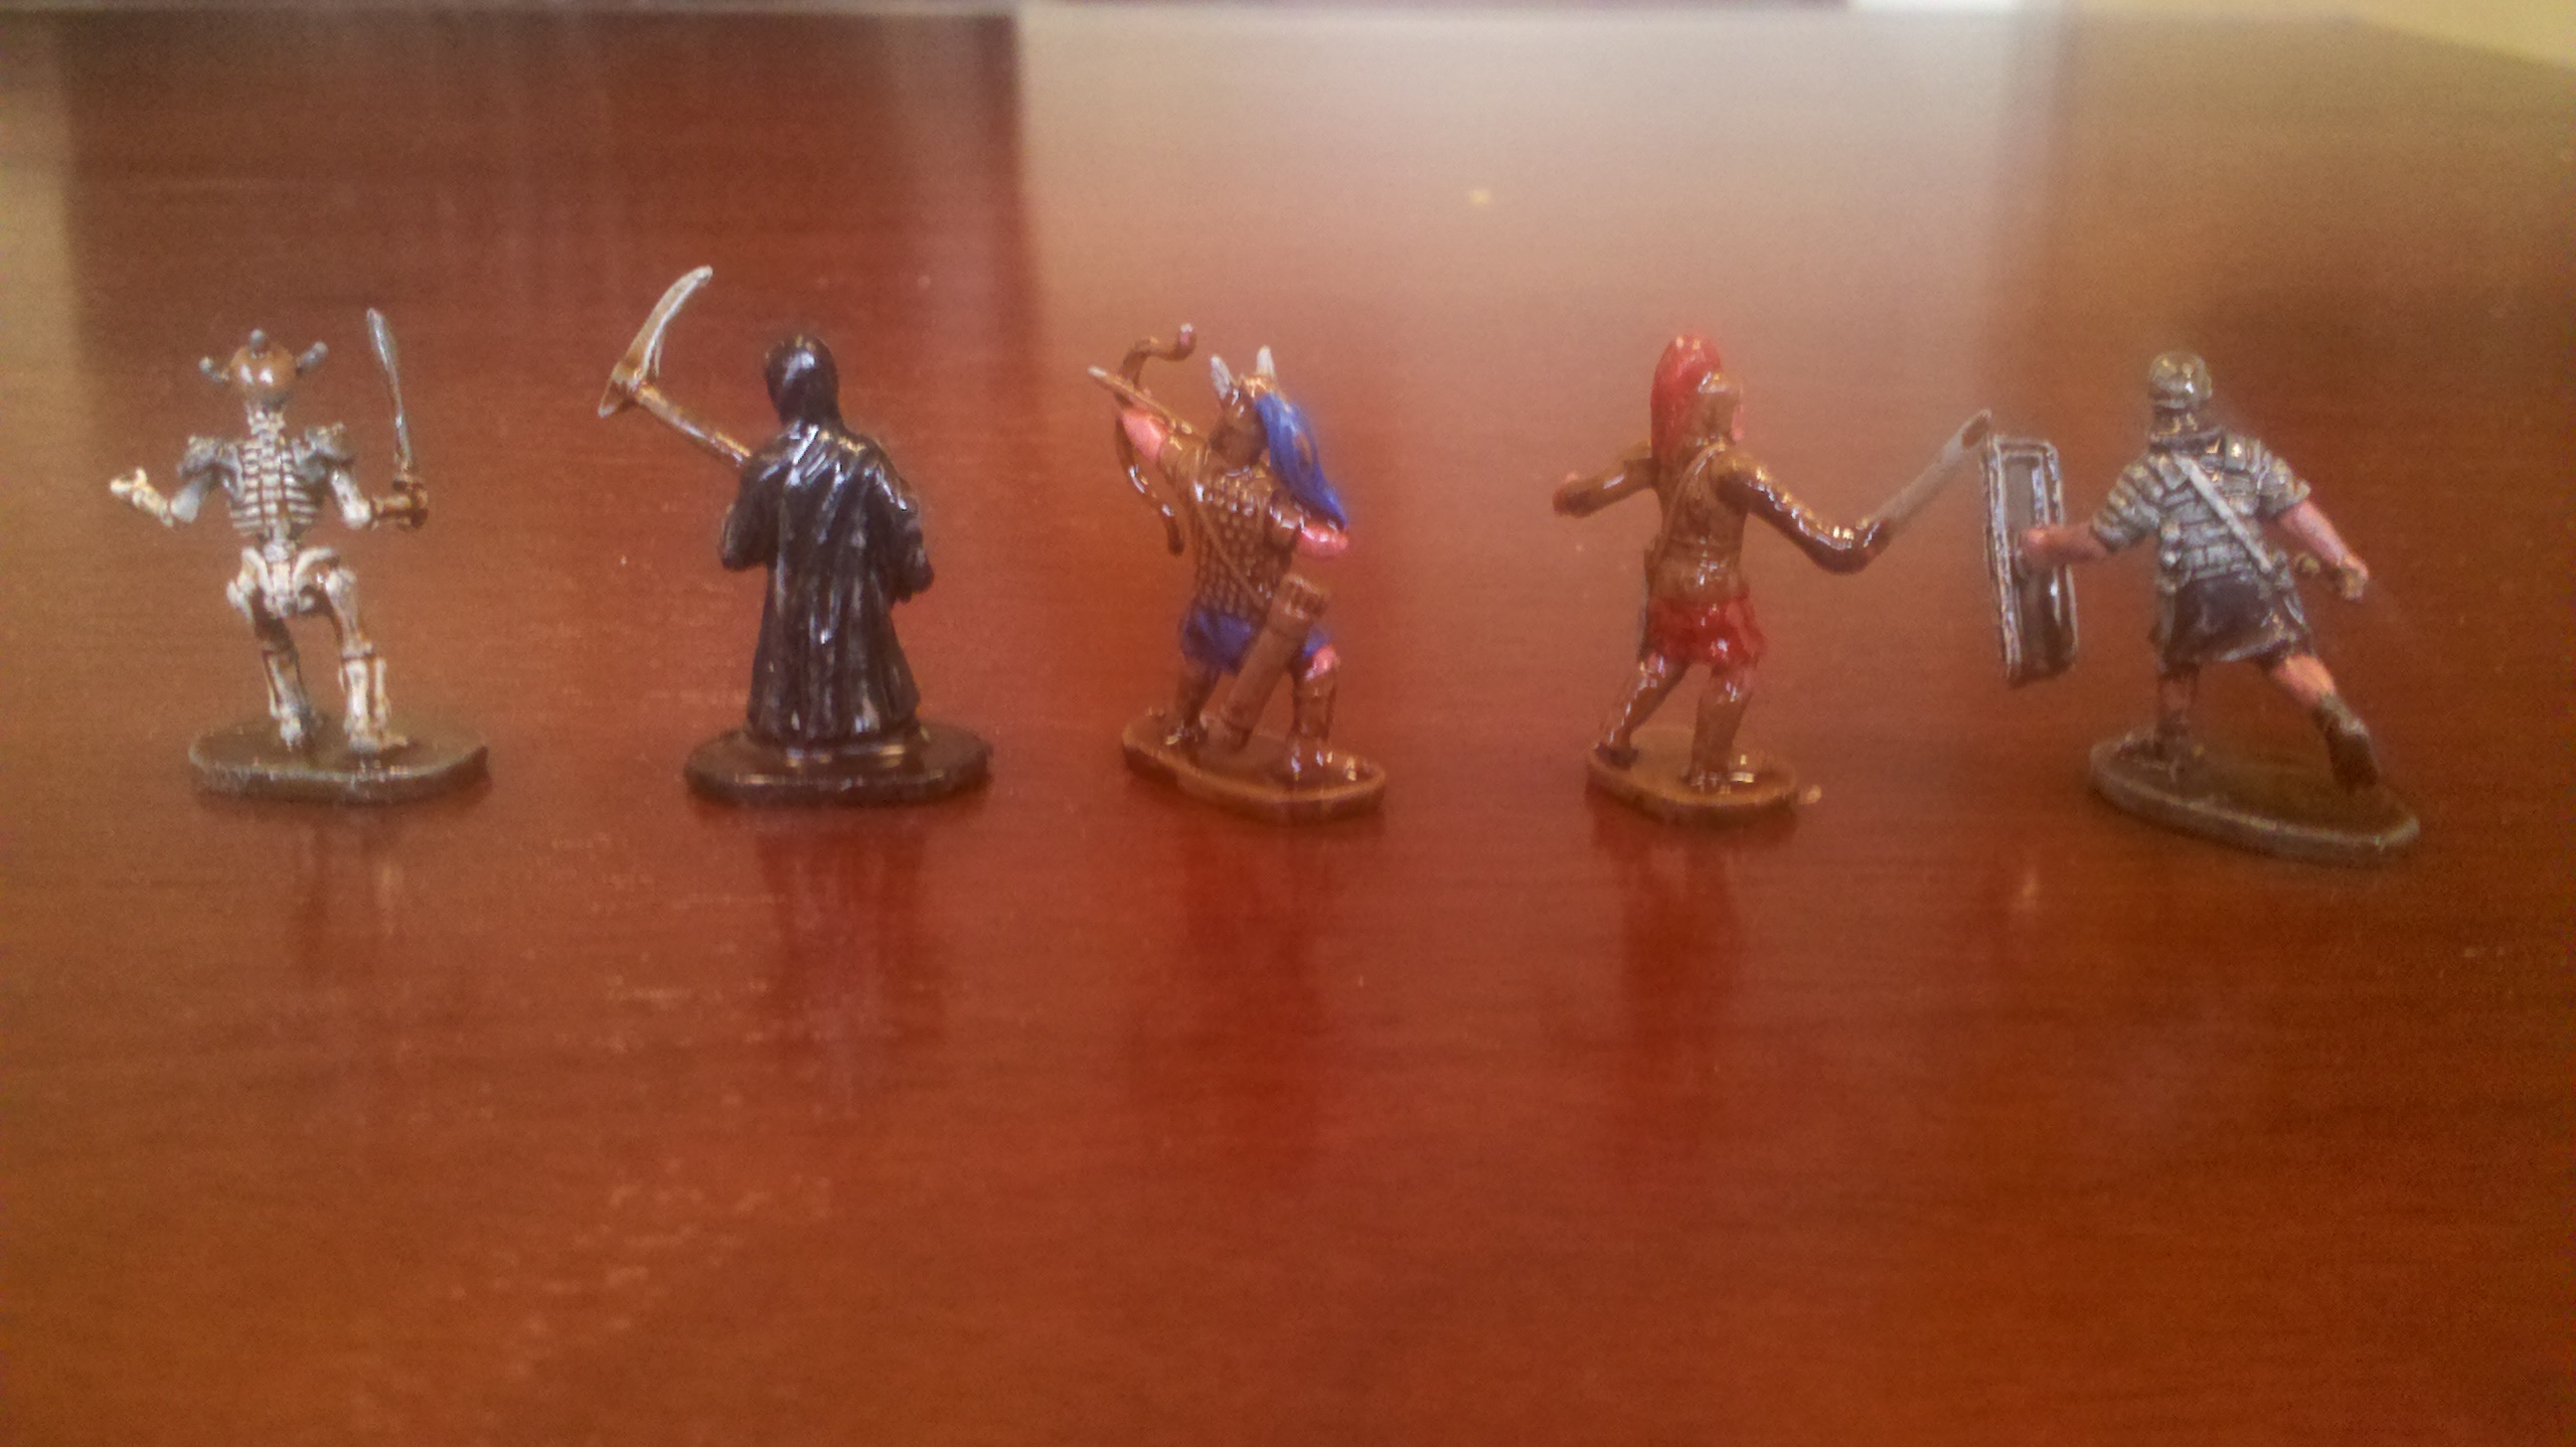 I used a technique called the "dip method" and you can see that the red-skirted army dude ended up with a blob of varnish stuck to his sword arm. I will watch that more carefully, that means I didn't fling enough varnish off the mini after dunking it. I didn't even notice that until I took the photo. It's not nearly as noticeable with the actual minis.
These are at what used to be called "24mm scale" which was the original role playing game scale since that makes a 24mm mini more or less equal to an average height human where 1" equals 6 feet (sometimes called 1/72 scale). Modern RPG has experienced mini scale creep and the current standard for games like D&D, HeroClicks, WarHammer and others is actually 30mm, so these are actually 20% smaller than the modern standard (which is likely why I was able to buy about 400 minis for such a cheap price) which is quite noticeable. I intend to mount them on thick bases to try to minimize the obvious size differences when using them in actual games, but I am worried the size difference will be distracting.
Still, I've learned a ton about mini painting. If I had sets of 30mm miniatures, I think it would feel like painting giants after painting all these.
Where has Cosmic been?
By CosmicConservativeWell, I've been busy painting.
I bought a bunch of cheap (not low quality, just cheap) miniatures from Taiwan (about 400 in all) and have been painting them for the past several days. Painting and painting and painting.
I will post pics when I am done.
What D&D Character am I?
By CosmicConservativeI Am A: Lawful Good Human Wizard (7th Level)
Ability Scores:
Strength-13
Dexterity-17
Constitution-14
Intelligence-17
Wisdom-16
Charisma-14
Alignment:
Lawful Good A lawful good character acts as a good person is expected or required to act. He combines a commitment to oppose evil with the discipline to fight relentlessly. He tells the truth, keeps his word, helps those in need, and speaks out against injustice. A lawful good character hates to see the guilty go unpunished. Lawful good is the best alignment you can be because it combines honor and compassion. However, lawful good can be a dangerous alignment because it restricts freedom and criminalizes self-interest.
Race:
Humans are the most adaptable of the common races. Short generations and a penchant for migration and conquest have made them physically diverse as well. Humans are often unorthodox in their dress, sporting unusual hairstyles, fanciful clothes, tattoos, and the like.
Class:
Wizards are arcane spellcasters who depend on intensive study to create their magic. To wizards, magic is not a talent but a difficult, rewarding art. When they are prepared for battle, wizards can use their spells to devastating effect. When caught by surprise, they are vulnerable. The wizard's strength is her spells, everything else is secondary. She learns new spells as she experiments and grows in experience, and she can also learn them from other wizards. In addition, over time a wizard learns to manipulate her spells so they go farther, work better, or are improved in some other way. A wizard can call a familiar- a small, magical, animal companion that serves her. With a high Intelligence, wizards are capable of casting very high levels of spells.
Find out What Kind of Dungeons and Dragons Character Would You Be?, courtesy of Easydamus (e-mail)
Ability Scores:
Strength-13
Dexterity-17
Constitution-14
Intelligence-17
Wisdom-16
Charisma-14
Alignment:
Lawful Good A lawful good character acts as a good person is expected or required to act. He combines a commitment to oppose evil with the discipline to fight relentlessly. He tells the truth, keeps his word, helps those in need, and speaks out against injustice. A lawful good character hates to see the guilty go unpunished. Lawful good is the best alignment you can be because it combines honor and compassion. However, lawful good can be a dangerous alignment because it restricts freedom and criminalizes self-interest.
Race:
Humans are the most adaptable of the common races. Short generations and a penchant for migration and conquest have made them physically diverse as well. Humans are often unorthodox in their dress, sporting unusual hairstyles, fanciful clothes, tattoos, and the like.
Class:
Wizards are arcane spellcasters who depend on intensive study to create their magic. To wizards, magic is not a talent but a difficult, rewarding art. When they are prepared for battle, wizards can use their spells to devastating effect. When caught by surprise, they are vulnerable. The wizard's strength is her spells, everything else is secondary. She learns new spells as she experiments and grows in experience, and she can also learn them from other wizards. In addition, over time a wizard learns to manipulate her spells so they go farther, work better, or are improved in some other way. A wizard can call a familiar- a small, magical, animal companion that serves her. With a high Intelligence, wizards are capable of casting very high levels of spells.
Find out What Kind of Dungeons and Dragons Character Would You Be?, courtesy of Easydamus (e-mail)